
- Overview
- Guides
- Concepts
- Considerations And Constraints
- Absolute File References
- Assembly Colocation Assumptions
- Concurrent Use Of Test Resources
- Cross Application Domain Testing
- Heavily Executed Code Under Test
- Implicit File Dependencies
- Multi Threaded Tests
- Netstandard Test Projects
- Project Atomicity
- Project Build Platform And Configuration
- Rdi Data Point Location
- Test Atomicity
- Unique Test Names
- Using NCrunch With Source Control
- Reference
- Global Configuration
- Overview
- Auto Adjust Clashing Marker Colours
- Build Log Verbosity
- Build Process Memory Limit
- Capabilities Of This Computer
- Control Cores Used For Test Execution
- Coverage Marker Style
- Cpu Cores Assigned To NCrunch Or Ide
- Custom Environment Variables
- Disable Global Hotkey
- Engine Hosting Strategy
- Fast Lane Threads
- Fast Lane Threshold
- Grid Maximum Reconnection Attempts
- Grid Reconnection Delay
- Impact Detection Mode
- Listening Port
- Log To Output Window
- Logging Verbosity
- Marker Colours
- Max Failing Test Trace Log Size
- Max Number Of Processing Threads
- Max Passing Test Trace Log Size
- Max Test Runners To Pool
- NCrunch Tool Window Colors
- Node Id (Name)
- Password
- Performance Aggregation Type
- Performance Display Sensitivity
- Pipeline Optimisation Priority
- Rdi Storage Settings
- Sliding Build Delay
- Snapshot Storage Directory
- Solution Storage Data Limit
- Spinner Colours
- Terminate Test Runners On Complete
- Test Process Memory Limit
- Tests To Execute On This Machine
- Text Output Font
- Workspace Base Path
- Solution Configuration
- Overview
- Additional Files For Grid Processing
- Additional Files To Include
- Allow Parallel Test Execution
- Allow Tests In Parallel With Themselves
- Infer Project References Using Assembly
- Instrumentation Mode
- NCrunch Cache Storage Path
- Only Consider Tests Outofdate If Impacted
- Project Config File Storage Path
- Show Coverage For Tests
- Show Metrics For Tests
- Tests To Execute Automatically
- Project Configuration
- Overview
- Additional Files To Include
- Allow Dynamic Code Contract Checks
- Allow Static Code Contract Checks
- Analyse Line Execution Times
- Autodetect Nuget Build Dependencies
- Build Priority
- Build Process Cpu Architecture
- Build Sdk
- Collect Control Flow During Execution
- Consider Inconclusive Tests As Passing
- Copied Project Dependencies
- Copy Referenced Assemblies To Workspace
- Custom Build Properties
- Data Storage File Size
- Default Test Timeout
- Detect Stack Overflow
- Enable Rdi
- Files Excluded From Auto Build
- Framework Utilisation Types
- Ignore This Component Completely
- Implicit Project Dependencies
- Include Static References In Workspace
- Instrument Output Assembly
- Method Data Limit
- Ms Test Thread Apartment State
- Preload Assembly References
- Prevent Signing Of Assembly
- Proxy Process File Path
- Rdi Cache Size
- Required Capabilities
- Restrict Tostring Usage
- Run Pre Or Post Build Events
- String Length Limit
- Track File Dependencies
- Use Build Configuration
- Use Build Platform
- Use Cpu Architecture
- Runtime Framework
- Overview
- Atomic Attribute
- Category Attribute
- Collect Control Flow Attribute
- Distribute By Capabilities
- Duplicate By Dimensions
- Enable Rdi Attribute
- Environment Class
- Exclusively Uses Attribute
- Inclusively Uses Attribute
- Isolated Attribute
- Method Data Limit Attribute
- Requires Capability Attribute
- Restrict Tostring Attribute
- Serial Attribute
- String Length Limit Attribute
- Timeout Attribute
- Uses Threads Attribute
- Global Configuration
- Troubleshooting
- Tools
- Keyboard Shortcuts
- Manual Installation Instructions
Manual Installation Instructions
JetBrains Rider
Manual installation for JetBrains Rider is performed by downloading a ZIP file and loading it into the IDE through the Plugin Settings in Rider.
Be sure to check that you are running a version of Rider that matches the version supported by the downloaded ZIP file. The download page will give you the supported version of Rider before you click the download option. Note that each version of NCrunch is only built for a latest version of Rider at the time we perform a release. Unlike with VS, we do not support multiple versions of Rider concurrently.
There is no need to extract the ZIP file, as Rider can load the plugin directly from it on disk. If you download the 7-zip variant, you will need to extract the ZIP from the 7z archive before loading it.
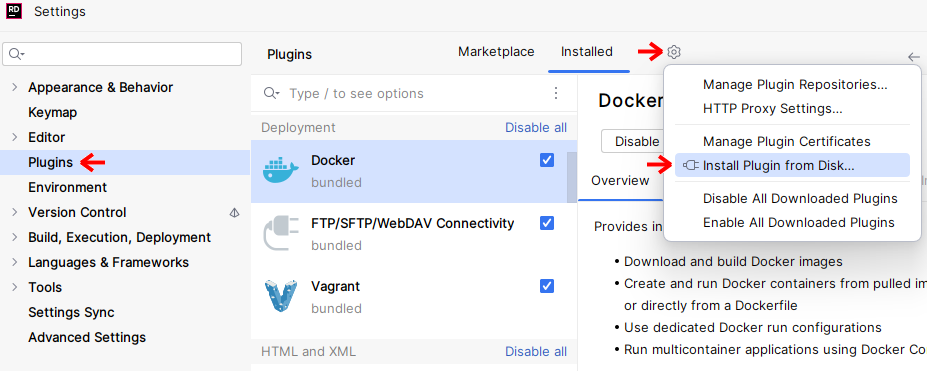
To load the plugin, start Rider normally and go to your settings. Choose 'Plugins' from the options on the left, then select the cog icon in the top right corner of the dialog. Choose the option to 'Install Plugin from Disk', then select the downloaded ZIP file. You will need to click the option to restart the IDE so that the plugin can load. NCrunch should be available after Rider restarts.
Visual Studio
It's recommended that you only try to install NCrunch manually under Visual Studio if you are experiencing problems with the MSI package(s). The MSIs contain useful steps that will make normal install situations less error-prone while also making it easier to remove the product in future.
Visual Studio 2026
To install NCrunch from a ZIP file for Visual Studio 2026, follow these instructions:
- Download the NCrunch VS2026 ZIP file from the download page
- Find your VS2026 install directory. VS2026 can be installed to any location (user specified). The default is at C:\Program Files\Microsoft Visual Studio\18\SKU
- Find your VS IDE extensions directory. Under the Professional version of VS2026 with a default install path, this will be C:\Program Files\Microsoft Visual Studio\18\Professional\Common7\IDE\Extensions.
- Extract the contents of the ZIP file to your VS extensions directory, so that the contents are under Remco Software. Ensure that Windows does not block the ZIP file before you decompress it (check the ZIP file properties using explorer and click 'Unblock' if this option exists).
- Again, this needs to be stressed: Make sure the ZIP file is not blocked by Windows before decompressing its contents. This is done by right clicking the ZIP in Windows Explorer, going to properties, and choosing 'Unblock' on the first page of the properties window.
- The vast majority of problems caused by manual installations are caused by Windows blocking files extracted from ZIP. Please, please, please make sure the files are unblocked before loading the IDE. We're really not kidding when we say that Windows can block them at O/S level even if you know they're perfectly safe.
- Using a command prompt or run dialog, execute the following command as an administrator in your Visual Studio's Common7\IDE directory: devenv.exe /setup /nosetupvstemplates
- Wait for the devenv.exe process to finish executing (watch it in Windows Task Manager)
- Load Visual Studio 2026 - NCrunch should now show as installed
If in future you choose to upgrade to a new version via installer or a newer zip package, make sure you remove ALL the installed files from the previous version first, then perform steps 4 to 7 (running devenv /setup) in order to reset Visual Studio's extension cache.
If you wish to remove NCrunch, you need to delete the installed files and then also perform steps 7 to 8 again.
Visual Studio 2022
To install NCrunch from a ZIP file for Visual Studio 2022, follow these instructions:
- Download the NCrunch VS2022 ZIP file from the download page
- Find your VS2022 install directory. VS2022 can be installed to any location (user specified). The default is at C:\Program Files\Microsoft Visual Studio\2022\SKU
- Find your VS IDE extensions directory. Under the Professional version of VS2022 with a default install path, this will be C:\Program Files\Microsoft Visual Studio\2022\Professional\Common7\IDE\Extensions.
- Extract the contents of the ZIP file to your VS extensions directory, so that the contents are under Remco Software. Ensure that Windows does not block the ZIP file before you decompress it (check the ZIP file properties using explorer and click 'Unblock' if this option exists).
- Again, this needs to be stressed: Make sure the ZIP file is not blocked by Windows before decompressing its contents. This is done by right clicking the ZIP in Windows Explorer, going to properties, and choosing 'Unblock' on the first page of the properties window.
- The vast majority of problems caused by manual installations are caused by Windows blocking files extracted from ZIP. Please, please, please make sure the files are unblocked before loading the IDE. We're really not kidding when we say that Windows can block them at O/S level even if you know they're perfectly safe.
- Using a command prompt or run dialog, execute the following command as an administrator in your Visual Studio's Common7\IDE directory: devenv.exe /setup /nosetupvstemplates
- Wait for the devenv.exe process to finish executing (watch it in Windows Task Manager)
- Load Visual Studio 2022 - NCrunch should now show as installed
If in future you choose to upgrade to a new version via installer or a newer zip package, make sure you remove ALL the installed files from the previous version first, then perform steps 4 to 7 (running devenv /setup) in order to reset Visual Studio's extension cache.
If you wish to remove NCrunch, you need to delete the installed files and then also perform steps 7 to 8 again.
Visual Studio 2019
To install NCrunch from a ZIP file for Visual Studio 2019, follow these instructions:
- Download the NCrunch VS2019 ZIP file from the download page
- Find your VS2019 install directory. VS2019 can be installed to any location (user specified). The default is at C:\Program Files (x86)\Microsoft Visual Studio\2019\SKU
- Find your VS IDE extensions directory. Under the Professional version of VS2019 with a default install path, this will be C:\Program Files (x86)\Microsoft Visual Studio\2019\Professional\Common7\IDE\Extensions.
- Extract the contents of the ZIP file to your VS extensions directory, so that the contents are under Remco Software. Ensure that Windows does not block the ZIP file before you decompress it (check the ZIP file properties using explorer and click 'Unblock' if this option exists).
- Again, this needs to be stressed: Make sure the ZIP file is not blocked by Windows before decompressing its contents. This is done by right clicking the ZIP in Windows Explorer, going to properties, and choosing 'Unblock' on the first page of the properties window.
- The vast majority of problems caused by manual installations are caused by Windows blocking files extracted from ZIP. Please, please, please make sure the files are unblocked before loading the IDE. We're really not kidding when we say that Windows can block them at O/S level even if you know they're perfectly safe.
- Using a command prompt or run dialog, execute the following command as an administrator in your Visual Studio's Common7\IDE directory: devenv.exe /setup /nosetupvstemplates
- Wait for the devenv.exe process to finish executing (watch it in Windows Task Manager)
- Load Visual Studio 2019 - NCrunch should now show as installed
If in future you choose to upgrade to a new version via installer or a newer zip package, make sure you remove ALL the installed files from the previous version first, then perform steps 4 to 7 (running devenv /setup) in order to reset Visual Studio's extension cache.
If you wish to remove NCrunch, you need to delete the installed files and then also perform steps 7 to 8 again.
Visual Studio 2017
To install NCrunch from a ZIP file for Visual Studio 2017, follow these instructions:
- Download the NCrunch VS2017 ZIP file from the download page
- Find your VS2017 install directory. VS2017 can be installed to any location (user specified). The default is at C:\Program Files (x86)\Microsoft Visual Studio\2017\SKU
- Find your VS IDE extensions directory. Under the Professional version of VS2017 with a default install path, this will be C:\Program Files (x86)\Microsoft Visual Studio\2017\Professional\Common7\IDE\Extensions.
- Extract the contents of the ZIP file to your VS extensions directory, so that the contents are under Remco Software. Ensure that Windows does not block the ZIP file before you decompress it (check the ZIP file properties using explorer and click 'Unblock' if this option exists).
- Again, this needs to be stressed: Make sure the ZIP file is not blocked by Windows before decompressing its contents. This is done by right clicking the ZIP in Windows Explorer, going to properties, and choosing 'Unblock' on the first page of the properties window.
- The vast majority of problems caused by manual installations are caused by Windows blocking files extracted from ZIP. Please, please, please make sure the files are unblocked before loading the IDE. We're really not kidding when we say that Windows can block them at O/S level even if you know they're perfectly safe.
- Using a command prompt or run dialog, execute the following command as an administrator in your Visual Studio's Common7\IDE directory: devenv.exe /setup /nosetupvstemplates
- Wait for the devenv.exe process to finish executing (watch it in Windows Task Manager)
- Load Visual Studio 2017 - NCrunch should now show as installed
If in future you choose to upgrade to a new version via installer or a newer zip package, make sure you remove ALL the installed files from the previous version first, then perform steps 4 to 7 (running devenv /setup) in order to reset Visual Studio's extension cache.
If you wish to remove NCrunch, you need to delete the installed files and then also perform steps 7 to 8 again.
Visual Studio 2015
To install NCrunch from a ZIP file for Visual Studio 2015, follow these instructions:
- Download the NCrunch VS2015 ZIP file from the download page
- Extract the contents of the ZIP file to your Program Files\Microsoft Visual Studio 14.0\Common7\IDE\Extensions directory, so that the contents are under Remco Software. Note that the Program Files directory will be Program Files (x86) if you are running on a 64-bit machine. Ensure that Windows does not block the ZIP file before you decompress it (check the ZIP file properties using explorer and click 'Unblock' if this option exists).
- Again, this needs to be stressed: Make sure the ZIP file is not blocked by Windows before decompressing its contents. This is done by right clicking the ZIP in Windows Explorer, going to properties, and choosing 'Unblock' on the first page of the properties window.
- The vast majority of problems caused by manual installations are caused by Windows blocking files extracted from ZIP. Please, please, please make sure the files are unblocked before loading the IDE. We're really not kidding when we say that Windows can block them at O/S level even if you know they're perfectly safe.
- Using a command prompt or run dialog, execute the following command as an administrator: Program Files\Microsoft Visual Studio 14.0\Common7\IDE\devenv.exe /setup /nosetupvstemplates
- Wait for the devenv.exe process to finish executing (watch it in Windows Task Manager)
- Load Visual Studio 2015 - NCrunch should now show as installed
If in future you choose to upgrade to a new version via installer or a newer zip package, make sure you remove ALL the installed files from the previous version first, then perform steps 3 and 4 (running devenv /setup) in order to reset Visual Studio's extension cache.
If you wish to remove NCrunch, you need to delete the installed files and then also perform steps 5 and 6 again.
Visual Studio 2013
To install NCrunch from a ZIP file for Visual Studio 2013, follow these instructions:
- Download the NCrunch VS2013 ZIP file from the download page
- Extract the contents of the ZIP file to your Program Files\Microsoft Visual Studio 12.0\Common7\IDE\Extensions directory, so that the contents are under Remco Software. Note that the Program Files directory will be Program Files (x86) if you are running on a 64-bit machine. Ensure that Windows does not block the ZIP file before you decompress it (check the ZIP file properties using explorer and click 'Unblock' if this option exists).
- Again, this needs to be stressed: Make sure the ZIP file is not blocked by Windows before decompressing its contents. This is done by right clicking the ZIP in Windows Explorer, going to properties, and choosing 'Unblock' on the first page of the properties window.
- The vast majority of problems caused by manual installations are caused by Windows blocking files extracted from ZIP. Please, please, please make sure the files are unblocked before loading the IDE. We're really not kidding when we say that Windows can block them at O/S level even if you know they're perfectly safe.
- Using a command prompt or run dialog, execute the following command as an administrator: Program Files\Microsoft Visual Studio 12.0\Common7\IDE\devenv.exe /setup /nosetupvstemplates
- Wait for the devenv.exe process to finish executing (watch it in Windows Task Manager)
- Load Visual Studio 2013 - NCrunch should now show as installed
If in future you choose to upgrade to a new version via installer or a newer zip package, make sure you remove ALL the installed files from the previous version first, then perform steps 3 and 4 (running devenv /setup) in order to reset Visual Studio's extension cache.
If you wish to remove NCrunch, you need to delete the installed files and then also perform steps 5 and 6 again.
Visual Studio 2012
To install NCrunch from a ZIP file for Visual Studio 2012, follow these instructions:
- Download the NCrunch VS2012 ZIP file from the download page
- Extract the contents of the ZIP file to your Program Files\Microsoft Visual Studio 11.0\Common7\IDE\Extensions directory, so that the contents are under Remco Software. Note that the Program Files directory will be Program Files (x86) if you are running on a 64-bit machine. Ensure that Windows does not block the ZIP file before you decompress it (check the ZIP file properties using explorer and click 'Unblock' if this option exists).
- Again, this needs to be stressed: Make sure the ZIP file is not blocked by Windows before decompressing its contents. This is done by right clicking the ZIP in Windows Explorer, going to properties, and choosing 'Unblock' on the first page of the properties window.
- The vast majority of problems caused by manual installations are caused by Windows blocking files extracted from ZIP. Please, please, please make sure the files are unblocked before loading the IDE. We're really not kidding when we say that Windows can block them at O/S level even if you know they're perfectly safe.
- Using a command prompt or run dialog, execute the following command as an administrator: Program Files\Microsoft Visual Studio 11.0\Common7\IDE\devenv.exe /setup /nosetupvstemplates
- Wait for the devenv.exe process to finish executing (watch it in Windows Task Manager)
- Load Visual Studio 2012 - NCrunch should now show as installed
If in future you choose to upgrade to a new version via installer or a newer zip package, make sure you remove ALL the installed files from the previous version first, then perform steps 3 and 4 (running devenv /setup) in order to reset Visual Studio's extension cache.
If you wish to remove NCrunch, you need to delete the installed files and then also perform steps 5 and 6 again.
Visual Studio 2010
To install NCrunch from a ZIP file for Visual Studio 2010, follow these instructions:
- Download the NCrunch VS2010 ZIP file from the download page
- Extract the contents of the ZIP file to your Program Files\Microsoft Visual Studio 10.0\Common7\IDE\Extensions directory, so that the contents are under Remco Software. Note that the Program Files directory will be Program Files (x86) if you are running on a 64-bit machine. Ensure that Windows does not block the ZIP file before you decompress it (check the ZIP file properties using explorer and click 'Unblock' if this option exists).
- Again, this needs to be stressed: Make sure the ZIP file is not blocked by Windows before decompressing its contents. This is done by right clicking the ZIP in Windows Explorer, going to properties, and choosing 'Unblock' on the first page of the properties window.
- The vast majority of problems caused by manual installations are caused by Windows blocking files extracted from ZIP. Please, please, please make sure the files are unblocked before loading the IDE. We're really not kidding when we say that Windows can block them at O/S level even if you know they're perfectly safe.
- Load Visual Studio 2010 - NCrunch should now show as installed
If in future you choose to upgrade to a new version via installer or a newer zip package, make sure you remove ALL the installed files from the previous version first.
Grid Node Server
Where possible, it's strongly recommended you use the MSI to install the NCrunch Grid Node Server. A manual installation of this component is more complex than that of the NCrunch Visual Studio package.
To install the NCrunch Grid Node Server from a ZIP file, follow these instructions:
- Download the NCrunch Grid Node Server ZIP file from the download page
- Extract the contents of the ZIP file to a directory you'd like to install to. Ensure that Windows does not block the ZIP file before you decompress it (check the ZIP file properties using explorer and click 'Unblock' if this option exists).
- The vast majority of problems caused by manual installations are caused by Windows blocking files extracted from ZIP. Please, please, please make sure the files are unblocked before starting the grid node. We're really not kidding when we say that Windows can block them at O/S level even if you know they're perfectly safe. Unblocking directories usually won't work - you need to select the individual files and choose to unblock them or unblock the original ZIP before decompressing it. Please don't blame us for this, it's Windows.
- Open a command prompt with administrator privileges
- Use the SC command to register the service application. You'll need to specify the full path to the NCrunch.GridNode.Service.exe file, regardless of where the command prompt is opened. Ensure the service is named 'NCrunch Grid Node Service' - this is important as otherwise the service configuration tools won't work correctly. For example, if the ZIP was extracted to "C:\NCrunch Grid Node Server", you would run: sc.exe create "NCrunch Grid Node Service" binPath= "C:\NCrunch Grid Node Server\NCrunch.GridNode.Service.exe" start= auto
- Run the NCrunch.GridNode.WizardLauncher.exe application with Administrator Privileges. Do not skip this step! Otherwise the service will be started using a default password when the computer is next restarted, which is a potential security issue.
- Complete the wizard. When the wizard finishes, it will automatically start the service application.
- If you wish to further tune the configuration of the service, you can also run NCrunch.GridNode.Configuration.exe.
- Make sure you add an exclusion to your firewall so that the service application can accept incoming TCP connections. Unless changed, the service will use TCP port 41141.
Console Tool
To install the NCrunch Console Tool manually, follow these instructions:
- Download the NCrunch Console Tool ZIP file from the download page
- Extract the contents of the ZIP file to a directory you'd like to install to. Ensure that Windows does not block the ZIP file before you decompress it (check the ZIP file properties using explorer and click 'Unblock' if this option exists).
- The vast majority of problems caused by manual installations are caused by Windows blocking files extracted from ZIP. Please, please, please make sure the files are unblocked before running the console tool. We're really not kidding when we say that Windows can block them at O/S level even if you know they're perfectly safe. Unblocking directories usually won't work - you need to select the individual files and choose to unblock them or unblock the original ZIP file. Please don't blame us for this, it's Windows.
- If you are using TFS, you need to set a system-level environment variable 'NCrunchConsoleInstallDir' to point to the directory you've extracted the files to. Make sure you have a blackslash at the end of the directory name, i.e. 'C:\Program Files (x86)\NCrunch Console Tool\'.
License Server
See here for the License Server installation instructions.