
- Overview
- Guides
- Concepts
- Considerations And Constraints
- Absolute File References
- Assembly Colocation Assumptions
- Concurrent Use Of Test Resources
- Cross Application Domain Testing
- Heavily Executed Code Under Test
- Implicit File Dependencies
- Multi Threaded Tests
- Netstandard Test Projects
- Project Atomicity
- Project Build Platform And Configuration
- Rdi Data Point Location
- Test Atomicity
- Unique Test Names
- Using NCrunch With Source Control
- Reference
- Global Configuration
- Overview
- Auto Adjust Clashing Marker Colours
- Build Log Verbosity
- Build Process Memory Limit
- Capabilities Of This Computer
- Control Cores Used For Test Execution
- Coverage Marker Style
- Cpu Cores Assigned To NCrunch Or Ide
- Custom Environment Variables
- Disable Global Hotkey
- Engine Hosting Strategy
- Fast Lane Threads
- Fast Lane Threshold
- Grid Maximum Reconnection Attempts
- Grid Reconnection Delay
- Impact Detection Mode
- Listening Port
- Log To Output Window
- Logging Verbosity
- Marker Colours
- Max Failing Test Trace Log Size
- Max Number Of Processing Threads
- Max Passing Test Trace Log Size
- Max Test Runners To Pool
- NCrunch Tool Window Colors
- Node Id (Name)
- Password
- Performance Aggregation Type
- Performance Display Sensitivity
- Pipeline Optimisation Priority
- Rdi Storage Settings
- Sliding Build Delay
- Snapshot Storage Directory
- Solution Storage Data Limit
- Spinner Colours
- Terminate Test Runners On Complete
- Test Process Memory Limit
- Tests To Execute On This Machine
- Text Output Font
- Workspace Base Path
- Solution Configuration
- Overview
- Additional Files For Grid Processing
- Additional Files To Include
- Allow Parallel Test Execution
- Allow Tests In Parallel With Themselves
- Infer Project References Using Assembly
- Instrumentation Mode
- NCrunch Cache Storage Path
- Only Consider Tests Outofdate If Impacted
- Project Config File Storage Path
- Show Coverage For Tests
- Show Metrics For Tests
- Tests To Execute Automatically
- Project Configuration
- Overview
- Additional Files To Include
- Allow Dynamic Code Contract Checks
- Allow Static Code Contract Checks
- Analyse Line Execution Times
- Autodetect Nuget Build Dependencies
- Build Priority
- Build Process Cpu Architecture
- Build Sdk
- Collect Control Flow During Execution
- Consider Inconclusive Tests As Passing
- Copied Project Dependencies
- Copy Referenced Assemblies To Workspace
- Custom Build Properties
- Data Storage File Size
- Default Test Timeout
- Detect Stack Overflow
- Enable Rdi
- Files Excluded From Auto Build
- Framework Utilisation Types
- Ignore This Component Completely
- Implicit Project Dependencies
- Include Static References In Workspace
- Instrument Output Assembly
- Method Data Limit
- Ms Test Thread Apartment State
- Preload Assembly References
- Prevent Signing Of Assembly
- Proxy Process File Path
- Rdi Cache Size
- Required Capabilities
- Restrict Tostring Usage
- Run Pre Or Post Build Events
- String Length Limit
- Track File Dependencies
- Use Build Configuration
- Use Build Platform
- Use Cpu Architecture
- Runtime Framework
- Overview
- Atomic Attribute
- Category Attribute
- Collect Control Flow Attribute
- Distribute By Capabilities
- Duplicate By Dimensions
- Enable Rdi Attribute
- Environment Class
- Exclusively Uses Attribute
- Inclusively Uses Attribute
- Isolated Attribute
- Method Data Limit Attribute
- Requires Capability Attribute
- Restrict Tostring Attribute
- Serial Attribute
- String Length Limit Attribute
- Timeout Attribute
- Uses Threads Attribute
- Global Configuration
- Troubleshooting
- Tools
- Keyboard Shortcuts
- Manual Installation Instructions
NCrunch Console Tool Usage
Introduction
Available for NCrunch is a console tool that can operate without the need for an IDE. This tool has been designed primarily for use on build servers, though it can also be used in other scenarios as a replacement for build runs and testing tools. There are many advantages to using this tool, as it enables many of NCrunch's features (such as parallel execution and distributed processing).
This guide deals primarily with setting up the console tool on a team build server for continuous integration purposes. For more detailed information about the tool, please refer to the console tool documentation.
Requirements
The NCrunch console tool is essentially a headless version of NCrunch. It performs the same build and test actions in the same manner as the IDE plugin. This means that the build server using it must have installed all the necessary SDKs and toolsets required to build the target solution using MSBuild, along with any dependencies required by test code that will be running on the build server.
Most teams already have an existing build server that meets these requirements, as this server is likely to already be building their solutions and running tests. If you're uncertain whether your server is able to build your solution, it's often worth copying over the solution and running MSBuild.exe against it to verify that the server is correctly prepared. You may also want to try running your tests using a console version of your test framework to check for additional dependencies.
To use NCrunch with CI, you'll need to already have installed your CI server (i.e. TeamCity, CruiseControl .NET, etc).
Installation
The console tool can be installed either via MSI, or a ZIP file. The MSI doesn't include any special installation steps. Installation itself is essentially an xcopy deployment.
The MSI will install the tool under Program Files\Remco Software\NCrunch Console Tool. Note that the tool will not be added automatically to your PATH.
Configuration
Once the tool has been installed, you'll need to create a configuration file in order to use it. This can be skipped if you want to use the default configuration, though note that the default NCrunch configuration is fairly minimal and isn't prepared for parallel execution or distributed processing.
The configuration file used by the tool is the same as the global configuration file used by the NCrunch IDE plugin. On any machine with the IDE plugin installed, the file can usually be found at:
C:\Users\[USER]\AppData\Roaming\NCrunch\globalconfig.crunch.v3.xmlIf you have a pre-configured workstation with configuration that is similar or identical to that which should be used on the build server, you can freely copy this file over to the build server.
Alternatively, running the console tool (ncrunch.exe) on the build server without any parameters will generate a new configuration file at the same above location containing default settings.
Once you have a configuration file on the build server, you can freely edit this file using any text editor. Most of the settings in this file are irrelevant to the console tool. The most important setting in this file is 'MaxNumberOfProcessingThreads' which should be set to a sensible value (often equal to the number of CPU cores on the machine). As there's no need to reserve fast lane threads on a build server, it's also worth setting the 'FastLaneThreads' setting to '0'.
Because the 'GridNodeAddresses' setting contains encrypted password information, you'll need to copy this setting over from a pre-configured workstation if you wish the console tool to use distributed processing.
It's often worth storing your configuration file in a well known location (i.e. 'C:\NCrunchConfig\GlobalConfig.xml') instead of leaving it under the user profile. This is because many CI tools tend to run under a different user profile to the server's desktop user, leading them to resolve configuration from unexpected places. By storing your config file in a known location and specifying this location using a command line parameter, you can always be sure of which configuration is being used.
An important configuration setting worth investigating when using the console tool is the 'NCrunch cache storage path' solution-level setting. Because most CI systems will regularly perform a fresh checkout from the VCS, they may often end up running NCrunch with no cached data present. This cached data is important, as it contains timing information from previous test runs that is used by the engine to optimise future execution. A way to work around this problem is to set the 'NCrunch cache storage path' to an absolute path on the build server. In this way, it will always be present any fresh checkout from VCS. It's possible to specify an environment variable inside the setting if you need cached data to be placed differently when the solution is opened on regular development workstations. When using the console tool under Jetbrains' Team City, it will give an error if this configuration setting does not have a value.
It is possible to configure the tool for selective execution of tests by adjusting the Tests To Execute Automatically setting (in either a config file or through the command line override). Tests will only be queued for execution in the tool if the condition for this setting passes. This setting can be used to force the tool to execute only certain tests within the run (such as only those that have been detected as impacted). The condition strings for this setting can be created using the configuration window in NCrunch's interface in the IDE and copy/pasted where they are needed.
Licensing
Before the tool can be used, you'll need to specify a license for it. This is simple to do - just run the following command:
ncrunch.exe /licenseYou'll receive a popup dialog allowing you to choose a license. Note that the tool also supports a 30-day evaluation license.
If you're already a licensed NCrunch user, you won't need to buy a new license to use this tool. Simply place your existing license into the license dialog. See here for more information about how licensing works for the NCrunch console tool.
Trial Run
Before hooking the tool up to your CI system, it's important to give it a quick test via the command line. This can help save time later, as CI tools add an extra layer of complexity that can make troubleshooting difficult if the tool is behaving incorrectly.
If you don't already have a copy of your solution on the build server, copy it over or VCS check out to a temporary location.
Now run the following command:
ncrunch.exe SOLUTION.sln /c CONFIGFILE /o NCrunchResults -NCrunchCacheStoragePath CACHEDIRECTORYFor example:
ncrunch.exe c:\MySolution\MySolution.sln /c c:\NCrunchConfig\GlobalConfig.xml /o NCrunchResults -NCrunchCacheStoragePath C:\MySolution\MyNCrunchCacheYou should see the tool kick off and run a full build and test pass of the solution using the configuration you've specified. The results of this test run will be written to reports stored inside: c:\MySolution\NCrunchResults\
The NCrunchCacheStoragePath setting is important to tell the tool where it should store its data between runs. This should always be set using an absolute path to a dependable location on your disk. You'll want your CI system to always use the same set of stored data for each build. If you have multiple build configurations (i.e. multiple branches), make sure these are set to store their data in different places to avoid any crosstalk between the builds.
Open NCrunchResults\AllResults.html using a web browser for detailed information about what happened during the execution run. Check for build and load failures. If you hit a failure, you may need to examine the state of the solution and check whether you have any SDKs missing from the build server.
Assuming all is OK, you're now set to hook the tool up to your CI system.
Disabling Build Steps
Because you're able to run MSBuild indirectly through NCrunch, there is often less need to have a separate MSBuild step inside your CI.
Sometimes it can be useful to disable these separate build steps to improve the speed of your build. Note that NCrunch is not designed to produce build artifacts from release builds, so you should only do this if you are using your CI for verification only and not for producing installers or deployment packages.
Configuration With Team City
Configuring the NCrunch console tool with Jetbrains' Team City is a simple process. Once you've identified which build you'd like to run with NCrunch, enter the following settings:
Build Configuration Settings -> General Settings -> Artifact pathsAdd: NCrunchResults
Build Steps -> Add build step
Runner type: Command Line
Step name: NCrunch
Command executable: C:\Program Files\Remco Software\NCrunch Console Tool\NCrunch.exe (or wherever you installed the tool)
Command parameters: %system.teamcity.build.workingDir%\MySolution.sln /o NCrunchResults -NCrunchCacheStoragePath C:\MyNCrunchCache (.sln must be relative to checkout directory, cache storage path must be a static absolute path)
All other settings should be left to their default values.
Project Configuration Settings -> Report Tabs -> Create new build report tab
Tab Title: NCrunch
Start Page: NCrunchResults/AllResults.html
Project Configuration Settings -> Report Tabs -> Create new build report tab
Tab Title: NCrunch Timeline
Start Page: NCrunchResults/TimeLine.html
That's it! NCrunch will automatically detect Team City when it runs, and will output real-time information about running tests, builds, failures, etc. This allows Team City to track NCrunch results in a similar way to other build/test steps.
Once a build has run, you'll be able to find the report data inside the build artifacts. Two tabs are visible when you view a completed build: NCrunch and NCrunch Timeline. The NCrunch tab will show the test results as reported by NCrunch. The NCrunch TimeLine tab will show what the engine did during the run. All tasks on the local node and the grid can be tracked here. If other users are using the grid at the same time this will be visible too.
Configuration with Microsoft Team Foundation Server
To use the NCrunch Console Tool with TFS, follow these steps:
Install the console tool on the machine that hosts the build agent.
If you haven’t already created a build for you project, do so. Make sure that NuGet package restore is configured for your project.
Add the following Command Line step to the build.

Configure the Command Line step:

The Tool should point to the location of NCrunch.exe. The Arguments should start with the solution. The /o NCrunchResults is the location where the results from the run will be stored. We will add that folder to the artifacts in the next step so they are accessible in the build details. The last option is the location of the configuration file that will be used. You can specify more options if you so desire.
Add a Publish Build Artifacts step:

Configure the Publish Build Artifacts:
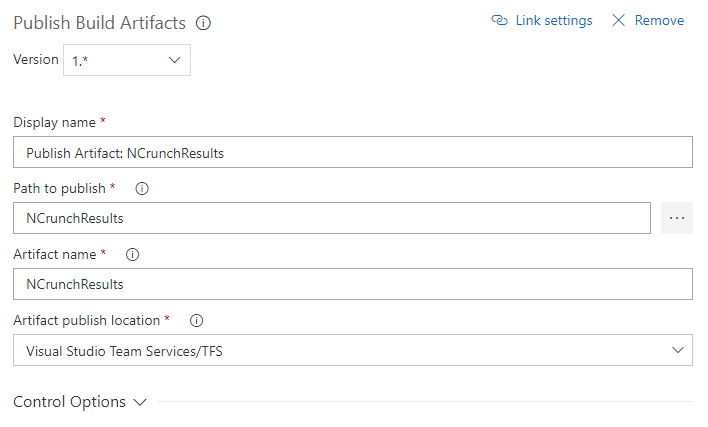
The Path to publish should be set to the same location as we just specified under the /o option. (NCrunchResults). We will publish the artifacts directly to TFS. You can also opt to store them on a files share.
When the build is run NCrunch will fail the build if tests are failing or not run. This behavior is configurable via command line options. You can inspect the results in the NCrunchResults artifact.
Configuration With Legacy Microsoft Team Foundation Server (xaml templates)
The design of TFS makes it difficult to cleanly integrate the NCrunch Console Tool into the continuous integration system. However, it is still possible to do this by piggybacking the console tool execution on MSBuild. The solution involves adding a custom project to the solution that will execute the console tool as part of the build, then storing the output from the tool inside the TFS drop folder.
Please note that the following instructions have only been tested with TFS 2013, although in principle it should be possible to use the same approach with other versions as all versions of TFS invoke MSBuild.
To use the NCrunch Console Tool with TFS, follow these steps:
Install the console tool on the machine TFS is to use for executing builds. If installing the tool manually from ZIP, don't forget to set up the environment variable.
Add a new project to your solution. You can use any of the standard project templates available in VS. A C# class library is fine.
Remove all references and files from the newly added project. Unload it by right-clicking it in the solution explorer.
Edit the project file by right clicking it in the solution explorer, or by using any text editor. Replace the contents of the file with:
<Project ToolsVersion="12.0" DefaultTargets="Build" xmlns="http://schemas.microsoft.com/developer/msbuild/2003">
<PropertyGroup>
<ProjectGuid>{E08BEA16-F507-485A-8DE4-B60157470B82}</ProjectGuid>
</PropertyGroup>
<Target Name="Build" Condition="'$(NCrunchConsoleInstallDir)' == ''">
<Error Text="This project can only be built on computers with the NCrunch Console Tool installed" />
</Target>
<Import Project="$(NCrunchConsoleInstallDir)NCrunch.Console.targets" Condition="'$(NCrunchConsoleInstallDir)' != '' and '$(OutDir)' != ''"/>
</Project>
Right click the project file in VS and choose to reload it.
Go to your NCrunch configuration for the newly added project. Turn on the 'Ignore this project completely' setting so that NCrunch doesn't give you noisy errors about it. NCrunch shouldn't try to build this project because it isn't a supported project type, and if it actually did work, it would be a recursive nightmare.
Go to the Visual Studio Configuration Manager (from the build configuration toolbar drop-down).
Ensure that the newly added project is not selected to be built from any of your standard build configurations - it isn't designed to be built outside TFS.
Create a new build configuration. You can name it something like 'TFS NCrunch Build'. DON'T choose to update your project files.
Under the new build configuration, turn off the build for ALL projects in your solution except for the new one you've added. This configuration will be used for TFS, and we usually want TFS to avoid building anything but the NCrunch project, as NCrunch will build the other projects in its own sandbox anyway. If you are using TFS to produce artifacts for release builds, then you should skip this step.
Open up your TFS server configuration. Edit your TFS build definition. Go to Process -> Build -> Configurations and make sure that you choose your newly added build configuration for the TFS build.
Check your new code/project into TFS. Make sure you also check in the .ncrunchproject file, as this contains the configuration entry that will tell NCrunch to avoid crunching the build runner project. TFS should now execute the NCrunch Console Tool using MSBuild. You can retrieve the build and test results from the TFS drop folder.